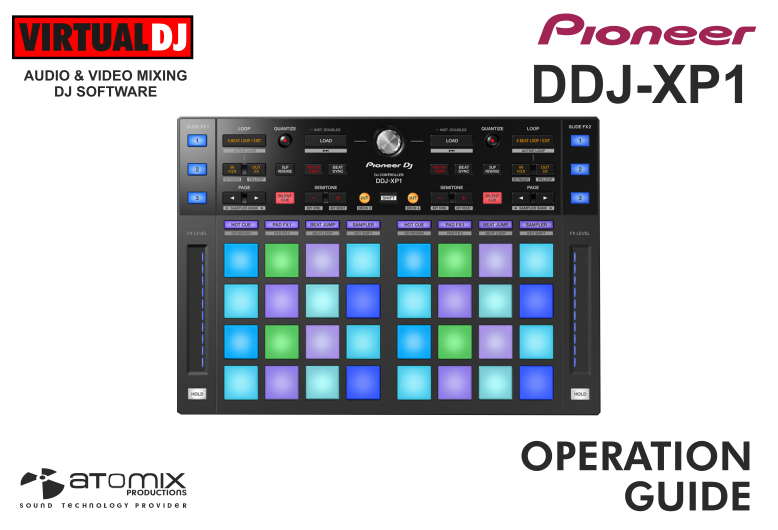
PIONEER DDJ-XP1
SETUP
Firmware & Drivers
Firmware: No firmware update is available at the time that this guide is written, but you should always check the product’s webpage https://www.pioneerdj.com/en/product/controller/ddj-xp1/black/support/#info
Drivers: No driver software is required for the Pioneer DDJ-XP1 to be installed. The device is a USB class compliant and your Operating System will auto-install the necessary driver when connected with a USB cable.
VirtualDJ 8 Setup
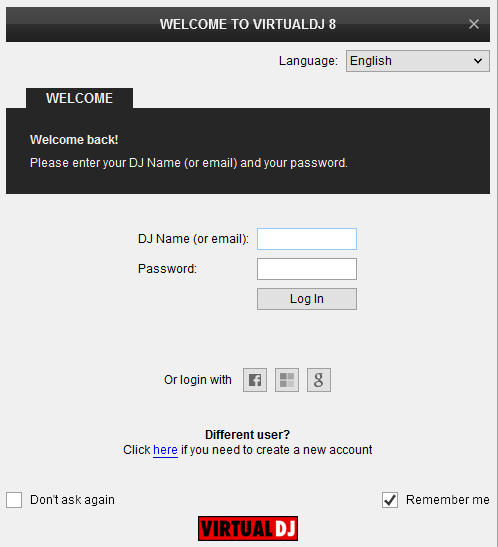
Once VirtualDJ 8 is launched, a Login Window will appear. Login with your virtualdj.com account.
A Pro Infinity, a DDJ-XP1 Plus or a Pro Subscription License is required to fully use the Pioneer DDJ-XP1 Without any of the above Licenses, the controller will operate for 10 minutes each time you restart VirtualDJ.
http://www.virtualdj.com/buy/index.html
Click to OK.
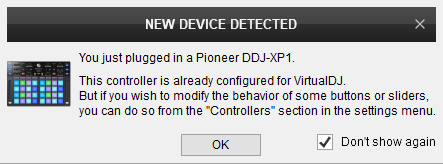
The unit is now ready to operate.
MIDI Operation
The unit should be visible in the CONTROLLERS tab of Config and the “factory default” available/selected from the Mappings drop-down list.
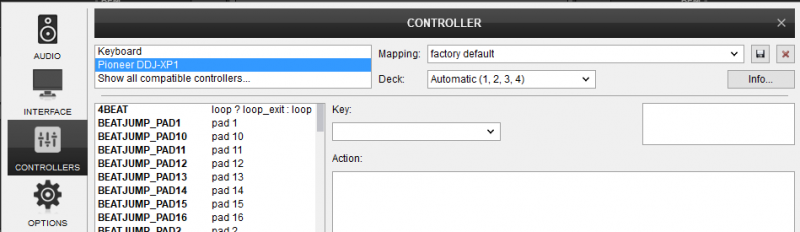
The factory default Mapping offers the functions described in this Manual, however those can be adjusted to your needs via VDJ Script actions. Find more details at http://www.virtualdj.com/wiki/VDJ8script.html
AUDIO Setup
The unit is not offering any pre-defined audio configuration, as no built-in audio interface is available. Depending on the sound card you need to use, manually create the necessary Master and Headphones audio configuration.
By default VirtualDJ 8 will send the Master Output to the built-in (default) sound card of your computer.
For further software settings please refer to the User Guide of VirtualDJ 8.
http://www.virtualdj.com/manuals/virtualdj8/index.html
LAYOUT
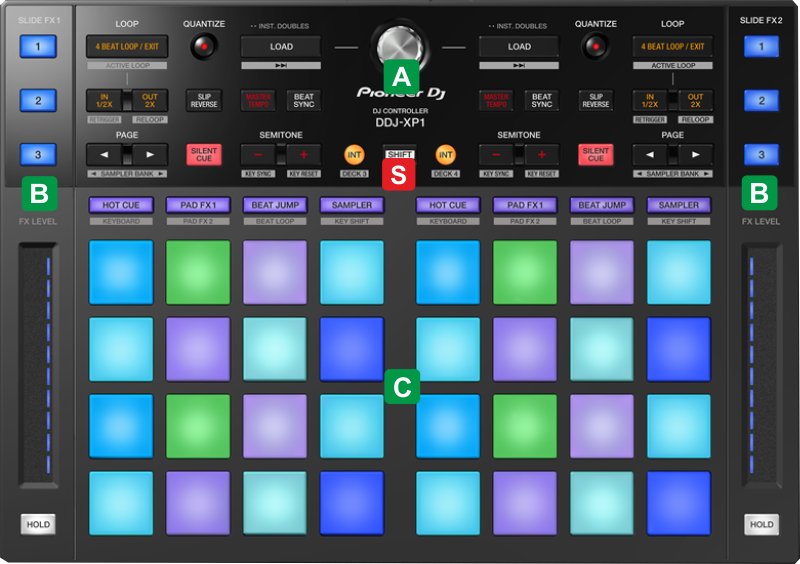
The functionality of each button, knob and connection per section (as shown in the image above) will be explained in detail in the following chapters
S SHIFT Hold this button down to access secondary functions of Pioneer DDJ-XP1 (mainly in black lettering inside a gray box)
A Controls
B Effects
C Pads
CONTROLS
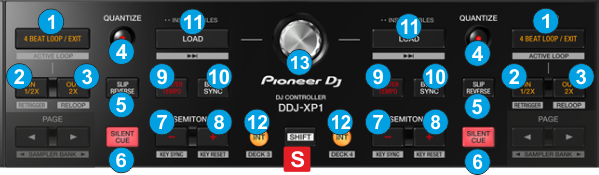
- 4BEAT LOOP/EXIT: When no loop is active, enables a Loop of 4 Beats at the current position. When any loop is active, it exits the Loop.
Hold SHIFT and then press this button to save a Loop at the current position. Hold SHIFT and then hold the same button for more than 1 second, to delete the Saved Loop. - IN: When no loop is active, use this button to set current track's position as the start position of a manual loop.
When loop is active use this button to half the size of the active loop.
Hold SHIFT down and then use this button to activate/deactivate the Saved Loop. The track will not jump to the position of the saved loop if later than current position (Load & Prepare) - OUT: When no loop is active, use this button to set current track's position as the end position of a manual loop.
When loop is active use this button to double the size of the active loop.
Hold SHIFT down and then use this button to trigger the last activated loop (re-loop) - QUANTIZE: When enabled, Hotcues and Loops will be snapped to the nearest beat/size (or other value depending on the setting globalQuantize - from VDJ Settings->OPTIONS tab)
- SLIP REVERSE: Press and hold this button to play the track backwards. On release the track will resume playing from the position it would have been if the button was never pressed.
- SILENT CUE: Press this button to mute the sound of the deck
- KEY SEMITONE - : Use these buttons to decrease the key of the track by 1 semitone.
Hold SHIFT down and then use this button to match the key of the track with the key of the opposite deck. - KEY SEMITONE + : Use these buttons to increase the key of the track by 1 semitone.
Hold SHIFT down and then use this button to reset the key of the track to its original value. - MASTER TEMPO: Press this button to enable/disable the Master Tempo (Key Lock) of the deck.
- BEAT SYNC: Press this button to sync the BPM and phase of the deck with the opposite one. Hold the same button for more than 1 second to reset the BPM/Tempo of the track to its original value.
Hold SHIFT and then press this button to set the deck as Master Deck. Using 4 decks skins, all other decks will sync to the Master Deck. - LOAD: Press this button to load the selected track from the Browser to the Left/Right Deck.
Double-press to clone/copy the opposite Deck to the Left/Right Deck
Hold SHIFT down and then use the buttons to load the next track from the Browser - INT: Press this button to enable/disable Timecode input (if set in Audio Setup).
Hold SHIFT and then press the left INT button to set Deck 1 or Deck 3 as Left Deck.
Hold SHIFT and then press the right INT button to set Deck 2 or Deck 4 as Right Deck.
All controls and functions on the DDJ-XP1 will apply to the selected Left/Right Deck. - BROWSE: Use this encoder to scroll through files or folders in the selected Browser list.
If focus is on the Songs or Sideview window, push the encoder to set focus to the Folders list.
If focus is on the Folders list, push the encoder to set focus to the Songs List (if folder has tracks), or expand its sub-folders and focus the 1st sub-folder available.
Hold SHIFT down and then push the encoder to open/close sub-folders (if available)
All controls and functions on the DDJ-XP1 will apply to the selected Left/Right Deck.
EFFECTS

- FX1. When enabled (LED lit), the FX LEVEL touch-strip will apply on the selected Effect of FX Slot 1.
Hold SHIFT and then use this button to select the next available Effect for the FX Slot 1 - FX2. When enabled (LED lit), the FX LEVEL touch-strip will apply on the selected Effect of FX Slot 2.
Hold SHIFT and then use this button to select the next available Effect for the FX Slot 2 - FX3. When enabled (LED lit), the FX LEVEL touch-strip will apply on the selected Effect of FX Slot 3.
Hold SHIFT and then use this button to select the next available Effect for the FX Slot 3 - FX LEVEL. Touch and slide this touch-strip to adjust the 1st Parameter of the selected FX Slot. and activate the Effect, as long as the touch-strip is held.
- HOLD. When enabled, the Effect will remain active after the touch-strip is released. Press again to turn the effect off.
Notes :
- Due to hardware/firmware limitation, only 1 FX Slot can be selected each time.
- When no FX Slot is selected, the LEDs of the FX1, FX2, FX3 will flash if HOLD is enabled or the touch-strip is used, indicating that a FX Slot needs to be selected.
PADS
All controls and functions on the DDJ-XP1 will apply to the selected Left/Right Deck.
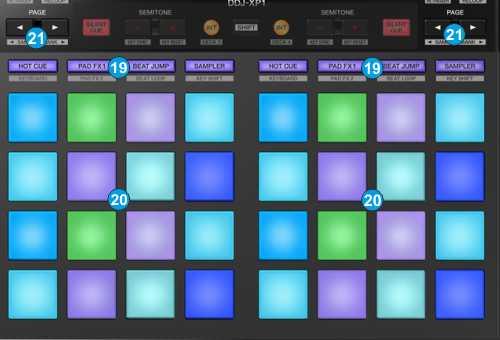
- PAD MODE: Use these 4 buttons to select a mode for the Pads. Hold SHIFT down and then use the same buttons to select an additional/secondary mode for the Pads. 8 Modes in total are available and can be selected individually per deck/side.
Each time a mode is selected, the related Pads page will be automatically loaded to the default GUI of VirtualDJ.
Press the same PAD MODE button again to toggle the Pads view on the GUI between the view of Pads 1-8 and Pads 9-16 - PADS: The 16 RGB colored Pads perform different functions, depending on the selected Pad mode. See next chapters for further details
- PAGE: Use these buttons to control the 1st Parameter of the selected mode (if available). Hold SHIFT and then use these buttons to control the 2nd Parameter of the selected mode (if available). The functionality of the Parameters depend on the selected mode. See next Chapters for further details.
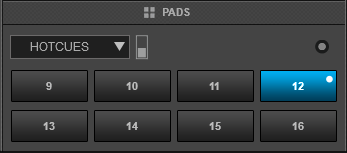
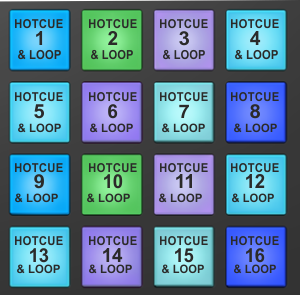
HOT CUES
Press the HOT CUE mode button to set the PADs to Hot Cue mode.
Each one of the 16* pad assigns a Hot Cue Point (1 to 16) or jumps the track to that Hot Cue Point (if assigned).
When a Hot Cue Button is unlit, you can assign a Hot Cue Point by pressing it at the desired point in your track. Once it is assigned, the Hot Cue Button will light on.
The color of the Pad depends on the setting nonColoredPOI or the assigned color from the POI Editor.
Hold SHIFT and then press a pad to delete its assigned Hot Cue Point.

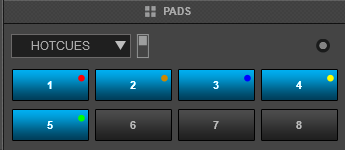
Use the PAGE buttons to jump the song to the previous/next assigned HotCue point.
Hold SHIFT and then use the PAGE buttons to jump 1 beat backwards/forward.
* By default the VirtualDJ GUI will show Pads 1 to 8. Use the HOTCUE mode button to toggle between the Pads 1-8 and Pads 9-16 views. Note that the Pads 9-16 view on the GUI will only be available when the Pioneer DDJ-XP1 is connected.
Read further details about Pads in the VirtualDJ 8 manual
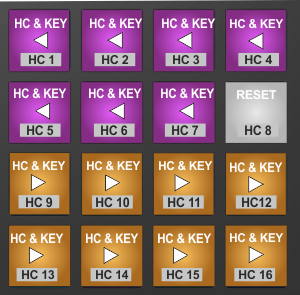
PAD FX1
Press the PAD FX1 mode button to set the PADs to Pad FX mode and automatically load the PAD FX page in the Pads area of the VirtualDJ GUI.The PAD FX Page is a custom page for the DDJ-XP1 and will only be available if the unit is connected.
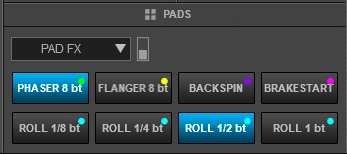
Each one of the 16* pad triggers a pre-defined Effect as per the following image.

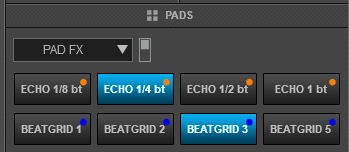
Pads 1-4 : Trigger the Echo Effect of 1/8, 1/4, 1/2 and 1 beats size respectively.
Pads 5-8 : Trigger the Beat Grid Effect of Slot 1,2,3 and 5 respectively.
Pad 9 : Triggers the Phaser Effect at 8 beats Speed.
Pad 10 : Triggers the Flanger Effect at beats Speed.
Pad 11 : Triggers the Backspin Effect
Pad 12 : Triggers the BrakeStart Effect
Pads 13-16 : Trigger a Loop Roll of 1/8,1/4.1/2 and 1 beat size respectively
The pre-defined Effects and their Parameters can be modified via the Pads Editor
The PAGE buttons have no functionality in this mode
* By default the VirtualDJ GUI will show Pads 1 to 8. Use the PAD FX1 mode button to toggle between the Pads 1-8 and Pads 9-16 views. Note that the Pads 9-16 view on the GUI will only be available when the Pioneer DDJ-XP1 is connected.
Read further details about Pads in the VirtualDJ 8 manual
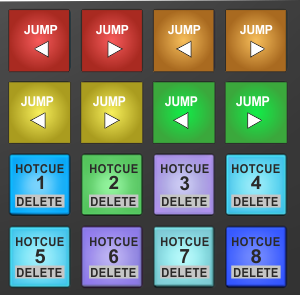
BEATJUMP
Press the BEATJUMP mode button to set the PADs to Beatjump+Hotcues mode and automatically load the related page in the Pads area of the VirtualDJ GUI.This Page is a custom page for the DDJ-XP1 and will only be available if the unit is connected.
In this mode, the 8 upper Pads will jump the track backwards/forward by the amount of beats depending on the selected page (from 1/8 beats to 32 Bars)
Each one of the 8 lower pad assigns a Hot Cue Point (1 to 8) or jumps the track to that Hot Cue Point (if assigned).
When a Hot Cue Button is unlit, you can assign a Hot Cue Point by pressing it at the desired point in your track. Once it is assigned, the Hot Cue Button will light on.
The color of the Pad depends on the setting nonColoredPOI or the assigned color from the POI Editor.
Hold SHIFT and then press a pad 9-16 to delete its assigned Hot Cue Point.
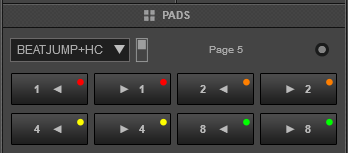
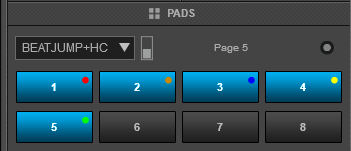
Use the PAGE buttons to select the Beatjump bank page (previous/next).
* By default the VirtualDJ GUI will show Pads 1 to 8. Use the BEATJUMP mode button to toggle between the Pads 1-8 and Pads 9-16 views. Note that the Pads 9-16 view on the GUI will only be available when the Pioneer DDJ-XP1 is connected.
Read further details about Pads in the VirtualDJ 8 manual
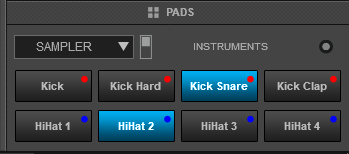
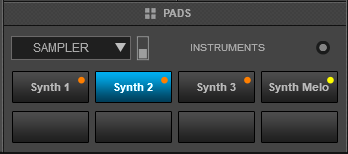
SAMPLER
Press the SAMPLER mode button to set the PADs to Sampler mode and automatically load the related page in the Pads area of the VirtualDJ GUI.
Each one of the 16 pads triggers a sample from the selected Sampler Bank of VirtualDJ. If a bank has less than 17 samples, both sides of the DDJ-XP1 will control the same samples. If a bank has more than 16 samples, the left side of the DDJ-XP1 will control samples 1 to 16 and the right side samples 17 to 32. The PAD will be lit if a sample slot is loaded and will blink if triggered.
Press the pads to trigger a sample. Depending on the selected trigger Pad mode, use SHIFT and the same pads to stop the sample.

Use the PAGE buttons to select the Sampler Bank (previous/next).
Hold [SHIFT down and then use the PAGE buttons to select the Trigger Pad mode (on/off, hold, stutter or un-mute)
* By default the VirtualDJ GUI will show Pads 1 to 8. Use the SAMPLER mode button to toggle between the Pads 1-8 and Pads 9-16 views. Note that the Pads 9-16 view on the GUI will only be available when the Pioneer DDJ-XP1 is connected.
Read further details about Pads in the VirtualDJ 8 manual
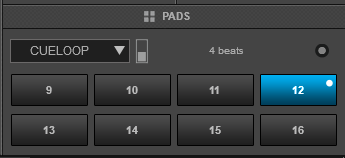
CUELOOP
Hold SHIFT down and then press the HOTCUE mode button to set the PADs to CueLoop mode and automatically load the related page in the Pads area of the VirtualDJ GUI.
In this mode each one of the 16 pads assigns a Hot Cue Point or jumps the track to that Hot Cue Point, but in both cases, it also triggers a Loop at that point (momentary or toggle depending on the selected mode from the Page menu).
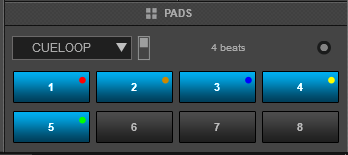
Hold SHIFT and then press a pad to stutter/jump to the Hotcue (loop will remain triggered)
Use the PAGE buttons to half/double the size of the triggered Loop.
HoldSHIFT and then use the PAGE buttons to select the On/Off (Toggle) or Hold (momentary) Loop trigger mode.
* By default the VirtualDJ GUI will show Pads 1 to 8. Hold SHIFT and then press the HOTCUE mode button to toggle between the Pads 1-8 and Pads 9-16 views. Note that the Pads 9-16 view on the GUI will only be available when the Pioneer DDJ-XP1 is connected.
Read further details about Pads in the VirtualDJ 8 manual
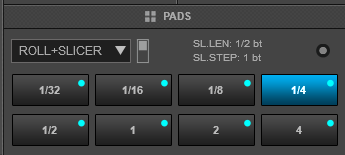
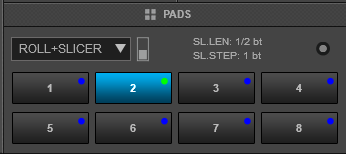
PAD FX2 (ROLL & SLICER)
Hold SHIFT down and then press the PAD FX1 mode button to set the PADs to Pad FX2 mode and automatically load the ROLL+SLICER page in the Pads area of the VirtualDJ GUI.
In this mode the upper Pads 1 to 8 trigger a momentary Loop Roll. Once the Pad is released, the track will resume playing from the position it would have been if the Loop Roll was never triggered. The exit point will be visible on the waveform of the VirtualDJ GUI with an additional “running” play marker.
Hold SHIFT to get a ½, ¾, 1 and 2 beats Loop Roll sizes for the pads 5 to 8.
Use the Page menu to apply the Loop Rolls to Video.
The 8 lower pads (9 to16) represent 8 sequential "Slices" in the Beat Grid. The currently playing Slice is represented by the currently green lit pad. The light will move through the pads as it progresses through each 8-Slice phrase. Press a pad to repeat that Slice (hold it down if you want to keep looping it).
Once the Pad is released the track will continue to play from the position it would have been if the pad was never pressed.
Hold SHIFT down and then use the Pads 9 to 16 to repeat the memorized Slices (the Slices played/repeated last time)
Use the PAGE buttons to adjust the length of the Loop applied to the slice. Hold SHIFT[/color] down and then use the PAGE buttons to adjust the step (size) of the Slices
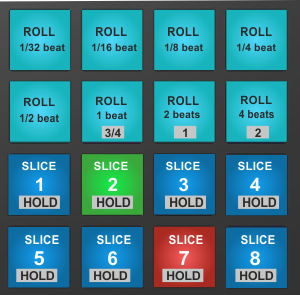
* By default the VirtualDJ GUI will show Pads 1 to 8. Hold SHIFT and then press the PAD FX1 mode button to toggle between the Pads 1-8 and Pads 9-16 views. Note that the Pads 9-16 view on the GUI will only be available when the Pioneer DDJ-XP1 is connected.
Read further details about Pads in the VirtualDJ 8 manual
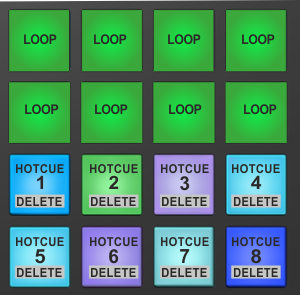
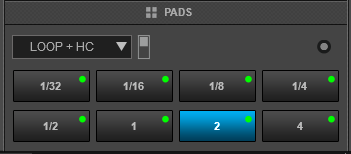
BEATLOOP (LOOP & HOTCUE)
Hold SHIFT down and then press the BEATJUMP mode button to set the PADs to BeatLoop mode and automatically load the LOOP+HC page in the Pads area of the VirtualDJ GUI.
In this mode the upper Pads 1 to 8 trigger an Auto Loop of a different size in beats, depending on the selected page. There are 6 different pages available with sizes starting from 1/32 up to 128 beats.
Use the PAGE buttons to select the previous/next page with the desired Loop sizes
Hold SHIFT and then use the PAGE buttons to change the behavior of the Loop pads, by selecting the On/Off (toggle), Hold (momentary – while pad is pressed) or the Roll mode (track will resume to the position it would have been once the pad is released)
the 8 lower Pads (9 to 16) assign a Hot Cue Point (1 to 8) or jump the track to that Hot Cue Point (if assigned).
When a Hot Cue Button is unlit, you can assign a Hot Cue Point by pressing it at the desired point in your track. Once it is assigned, the Hot Cue Button will light on.
The color of the Pad depends on the setting nonColoredPOI or the assigned color from the POI Editor
Hold SHIFT and then press a pad 9 to 6 to delete its assigned Hot Cue Point 1 to 8.
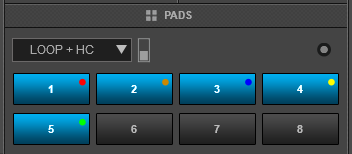
* By default the VirtualDJ GUI will show Pads 1 to 8. Hold SHIFT and then press the BEATJUMP mode button to toggle between the Pads 1-8 and Pads 9-16 views. Note that the Pads 9-16 view on the GUI will only be available when the Pioneer DDJ-XP1 is connected.
Read further details about Pads in the VirtualDJ 8 manual
KEYCUE
Hold SHIFT down and then press the SAMPLER mode button to set the PADs to KeyCue mode and automatically load the related page in the Pads area of the VirtualDJ GUI.
In this mode each of the 16 Pads triggers the selected Hotcue point (or the Temporary Cue if none selected or not available) at a selected Key semitone (from -15 to +15).
Eight different pages/banks are offered with various semitone values to use and a 0 value in order to reset the key to its original value is always offered in all pages.
Each time a Pad is pressed, the track will jump to the selected Hotcue point and will also alter the Key of the track to the value designated by its assigned value.
Hold SHIFT and then press a Pad in order to select a different Hotcue for the Key pads to trigger.
Use the PAGE buttons to adjust the Key of the track without triggering the Hotcue.
Hold SHIFT and then use the PAGE buttons to select a different page/bank with different key semitone values.
Use the menu of the KeyCue page from the VirtualDJ GUI, to select between Stutter and Play mode for the Hotcues and choose if the Pads will jump to the Hotcue or just alter the Key of the track.
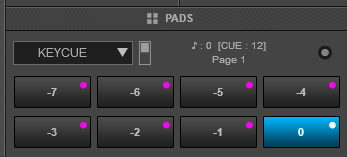
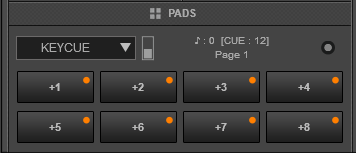
* By default the VirtualDJ GUI will show Pads 1 to 8. Hold SHIFT and then press the SAMPLER mode button to toggle between the Pads 1-8 and Pads 9-16 views. Note that the Pads 9-16 view on the GUI will only be available when the Pioneer DDJ-XP1 is connected.
Read further details about Pads in the VirtualDJ 8 manual